Trish and I are part of the DecoArt team and have been given product to create these beautiful Burlap Painted Ticking Stripe Utensil Holders.
I have a love affair with burlap {seriously I love it} and fall is the perfect time to use it in crafts and diy projects. Thanksgiving is right around the corner and I wanted to create a special accent for my holiday table. I decided to make this no sew, DIY Burlap Painted Ticking Stripe Utensil Holder…

I love the simplicity of the burlap ribbon I used, and the classic look of the ticking stripes. I even dressed it up just a touch, by using an amazing metallic paint for the stripes. This look will take me from Thanksgiving all the way to Christmas. Oh, how I love a craft like that!
So let’s get started crafting these simple, no sew, burlap painted utensil holders…

___________________________________
Supplies Needed:
1. 4 inch wide Wired Burlap Ribbon
2. Painter’s Tape in two sizes { I picked this up at Michaels }
3. Stencil Brush
4. DecoArt Dazzling Metallics paint in Rich Espresso
5. Hot Glue Gun and Glue Sticks
___________________________
Step One:

Cut a piece of burlap ribbon 17 inches long. Fray the ends 1/2 of an inch each by gently pulling out the horizontal threads. { I removed about 7 threads on each end }.
Step Two:

Tape off the burlap ribbon in the ticking stripe pattern with the painter’s tape. I wanted the middle stripe to be wider than the two outer stripes, and used the measurements in the photo above. Once I had one side taped off, I flipped the ribbon over and taped off the back side as well. Hold the ribbon up to the light to make sure the front and back tapes line up. You will want the stripes on both sides so that it is consistent when you fold the holder, later in the steps.
Step Three:

Using the stencil brush, apply the Dazzling Metallic Paint, in Rich Espresso, to the burlap. I use technique to stencil on fabrics that works well for me. I dip the stencil brush lightly in the paint and then dab it off on a paper towel before applying to the burlap. When I apply the paint to the burlap I use a circular motion and move quickly, not applying too much paint, just enough to cover the striped area. Once it dries, I flip the burlap ribbon over and repeat on the opposite side.
Step Four:

Once you have finished painting both sides. Allow to dry just a bit and then gently remove the painter’s tape and allow to fully dry. I just love the little bit of glimmer on the burlap from this fabulous paint! Lovely!

Once you remove the tape, you will have your ticking stripe. Believe me when I tell you, I messed up the first time. I tried painting the stripes with a sponge dauber. Yea, you can guess, it bled horribly under the tape. Sad but true. So I truly suggest a stencil brush, works fabulously on the burlap!
Step Five:

The final step is the fold the ribbon into the utensil holder shape. I folded one end down 2 inches and then folded the end up 5 1/4 inches. You may need to play around a bit with measurements to get the look you want, and to fit your utensils. I then used my hot glue gun to run a bead of glue down each of the 5 1/4 inch side, close to the edge, to seal the holder closed.
That’s It!
Now the fun really starts in setting your Thanksgiving table. I mixed very formal china and sterling silver utensils, with the earthy and casual burlap…

I also added a little bit of wheat, tied together in a small bundle with jute twine. I finished it off with a simple brown label as a place card. I think the wheat is a perfect sweet organic touch…

These burlap utensil holders add a touch of casual and warmth to my formal dining room, which is just the way our family likes it. We like to play dress up but someone always brings a little unexpected fun and whimsy!

So yes, I went on and made 7 more in no time to complete my table. The metallic rich espresso color is the perfect choice for fall and adding a bit of glimmer to your projects!
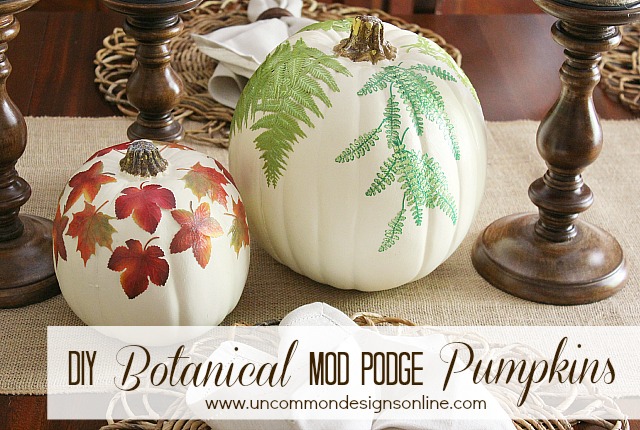
Want another great project for your Thanksgiving table? These Mod Podge Botanical Pumpkins are super simple and gorgeous…
Enjoy!
Trish Flake
Latest posts by Trish Flake (see all)
- Easy Leopard Painted Pumpkin - October 18, 2021
- Embroidered Swedish Dishcloths - May 3, 2020
- Easter Egg Decorating Party - March 21, 2020
Okay this is not only smart but beautiful! This are the little details I always forget about when entertaining! I’m pinning this for future reference!!
Thank you so much Jacque! I really am so happy with how they turned out and they add just the right touch to my table!
LOVE it! So pretty and festive for Thanksgiving. I just finished making place card holders with wheat, too. I’m obsessed with wheat 🙂
I just love it..and combined with burlap..perfecto! 😉
Amazing tutorial and utensil holder! I’d love to do this for Thanks! Please stop by Tutorials Tips and Tidbits tonight and share this great project. Link goes live at 8:00 pm
Thank you so much Yvonne! 😉
This is such a pretty touch to your beautiful fall table. I love this idea!!
Thank you so much Krista! They were fun to create!
Oooh love this Bonnie! Now can you just make me about 20 yards to decorate my Christmas tree? 🙂
Oh that would be gorgeous Kelly! You should totally do it! 😉
Absolutely beautiful! Love how rustic but pretty it looks! The hint of metallic really adds some fun!
Wonderful idea…..love it!
I am certainly keeping this post! I was wanting to do something different this year and get rid of my same old placemat/napkin combo and this is lovely! Thanksgiving for the spark!
Oh I love this SO much!! It has me thinking now of all of the other possibilities for painting ticking stripes on things. Well done! 🙂
Vanessa
I love this idea I can see doing these throughout the year for all different occasions … It’s the details that make a difference… Thanks for sharing!
What a great idea! Perfect for my Thanksgiving table 🙂 Life to the full! Melissa
what a great idea!!!! PINNING thi sfor sure…I actually have the same wicker plates from Pier 1 too! Christine from Little Brags
Love this, Bonnie! You are so stinkin’ talented! I wanna be you when I grow up! 🙂
xoxo
Traci
So clever, love it! I am going to do this for Thanksgiving if I have time! What is time? Where can you get more? 🙂
Oh boy… I’m loving this! Burlap is a weakness of mine 🙂
This is just too cute! I want to make these, where did you get your burlap ribbon?
So adorable! Have to try this.
Hi, I love these burlap utensil holders and yes they will be great for any occasion. I saw it on lemon paper designs party.
Julie
I love, love, love this idea. How cute.
Bonnie these are so cute and how easy! You always have the best ideas!
Bonnie I just love this idea… I am going to do this one for sure… I would love it if you came by and shared it at One More Time Events…http://www.onemoretimeevents.com/2013/11/home-and-hearth-share-it-one-more-time.html … Tammy
I just LOVE this. I think this would be great for the Thanksgiving table!
I love this project and shared it on Facebook yesterday. They loved it too! https://www.facebook.com/photo.php?fbid=10153458463105217&set=a.353593675216.349539.323548680216&type=1
Gorgeous and so simple to make too! You know I love my glam and bling – I just love the metallic paint you used! Your tablescape is stunning – I hope you have a wonderful Thanksgiving!
Love it! What a great idea! 🙂
I am going to be hosting our family Thanksgiving dinner this year, and I am going to make these. Really cute idea, thanks!!!
Burlap is such a fabulous choice for Thanksgiving and your utensil holder is the sweetest. Love how you tucked in the little bundle of wheat – perfect!
Thanks for the inspiration,
Suzanne
Pieced Pastimes
PS-Would love to have you link this up to Saturday Sparks. Links are open till Friday.
Love this!! Thanks for sharing!
OH I JUST LOVE THIS PROJECT !!!! ELEGANT , SIMPLE AND O SO CLASSY!! THANKS FOR A GREAT IDEA 🙂
This is genius! So simple, inexpensive, but looks so classy! I’d love it if you shared this post and some of your other recent posts at Worthwhile Wednesdays!
Allie
Excellent idea and execution, Bonnie. VIsiting from the Scoop – congrats on the feature!