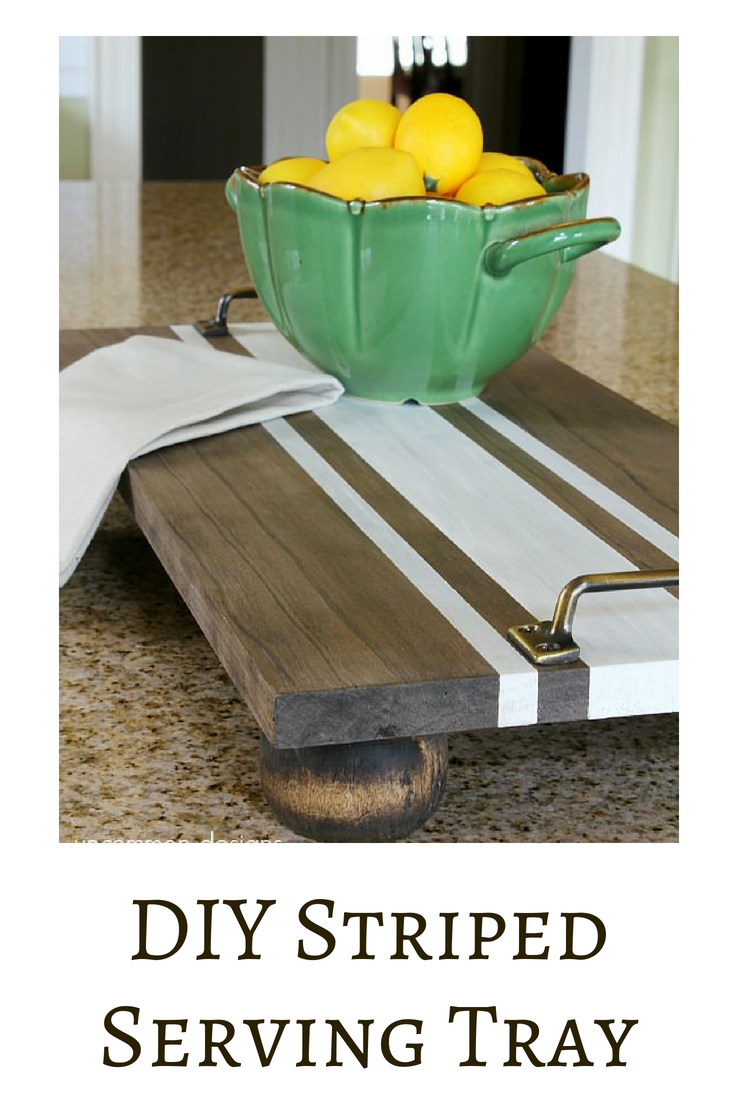
Ok…I am soooo excited to share this diy project with ya’ll! I am just thrilled with how it turned out and it is just perfect for my kitchen island. My little DIY Ticking Stripe Wooden Server Tray is just exactly what I was imagining as an accent for my kitchen…

Isn’t it cute! Yes, I do think a diy project can be cute. It just makes me smile when I walk in my kitchen. It is such a great way to keep things neat and tidy in the center of the island, while we work all around it. My kids do homework here on one side, while I prepare dinner on the other.
I had the awesome opportunity to try out the new Americana Decor Chalky Finish line of products by DecoArt that are currently available online at the Home Depot. This line of paint and paint products is really amazing. There are so many color choices, but I chose Chalky Finish in Lace for this project.
Let me show you how to make your own DIY Ticking Stripe Wooden Server Tray….
________________________________
Supplies Needed:
1. A 2 foot piece of 12 inch wide wood. { I used stain grade pine } 2. 4 furniture feet { these are bun feet with the screws already attached } 3. Americana Decor Chalky Finish paint in Lace 4. Foam paint brush 5. Painter’s tape 6. Pre-Stain conditioner { I used Minwax } 7. Stain color of choice { I used Dark Walnut } 8. 2 furniture pulls of choice { I used 2 antique brass ones } 9. Americana Decor Ultra-Matte Varnish 10. Pencil and Ruler 11. Drill and screwdriver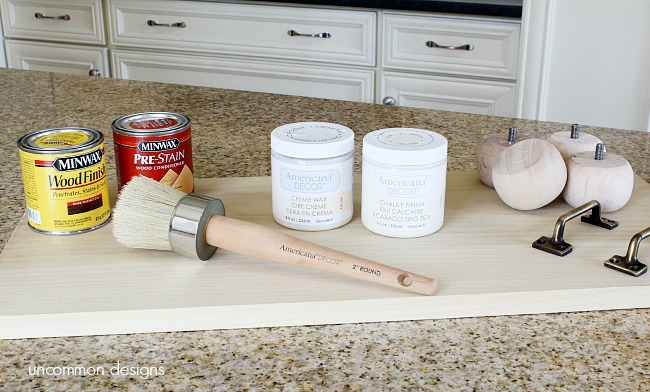 ___________________________________
Step One:

Apply the pre-stain conditioner and stain by following the directions on the product. Once the board and furniture feet are dry, you will determine where you would like the feet to go. I used a ruler and decided that 1 1/2 inches in would be a great placement. I traced the bun foot and then measured 1 1/2 inches in, on both sides of the corner and marked the measurement lightly with a pencil on both corner sides.
Step Two:
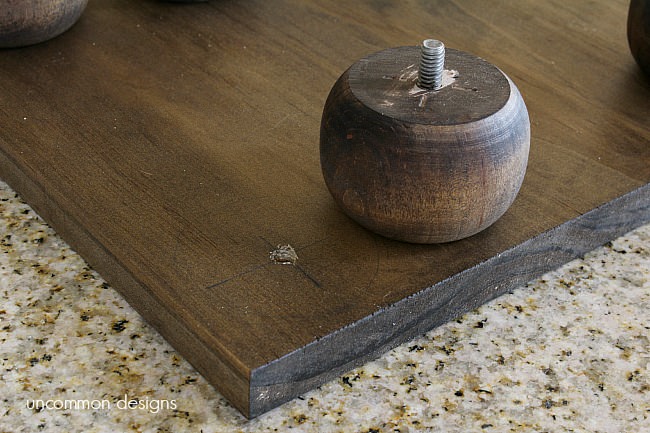
Using the ruler, I simply drew a line from each of the marks I had made previously. Where they crossed, was the center. So it makes a little “plus” sign as above. I then drilled a starter hole for the feet. HINT: Be sure to note the thickness of your wood and the length of your drill bit so that you do not drill all the way through the board.
Step Three:
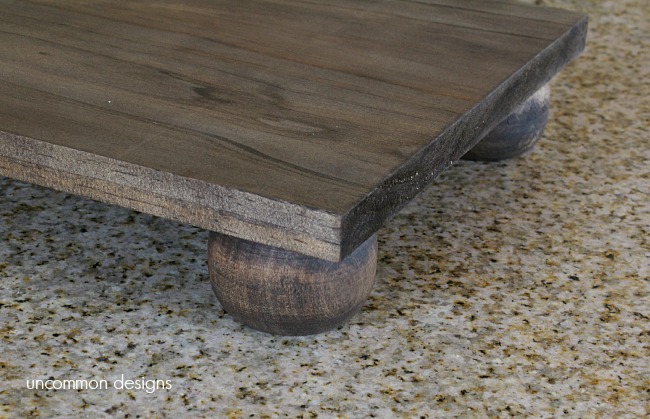
Once you have drilled all 4 holes, attach the bun feet by screwing them into the board. Make sure they are snug, but not over tightened.
Step Four:
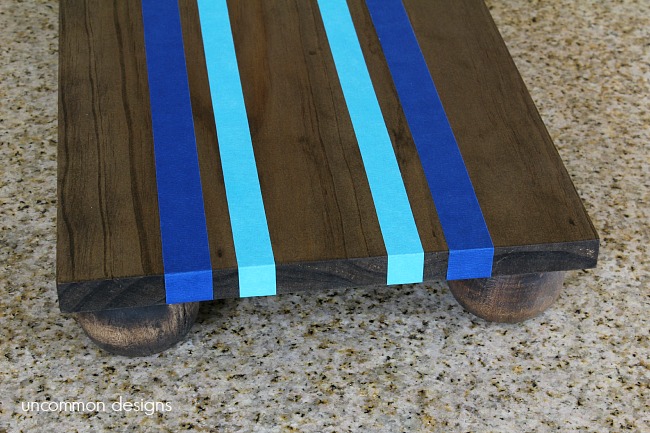
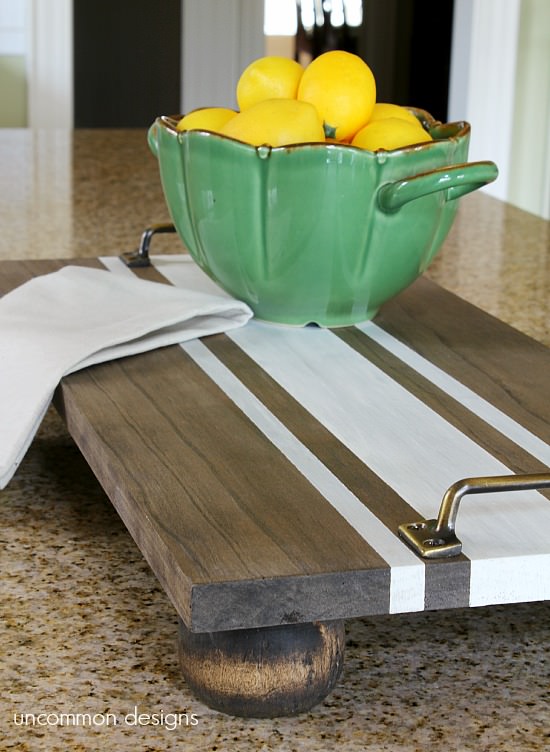
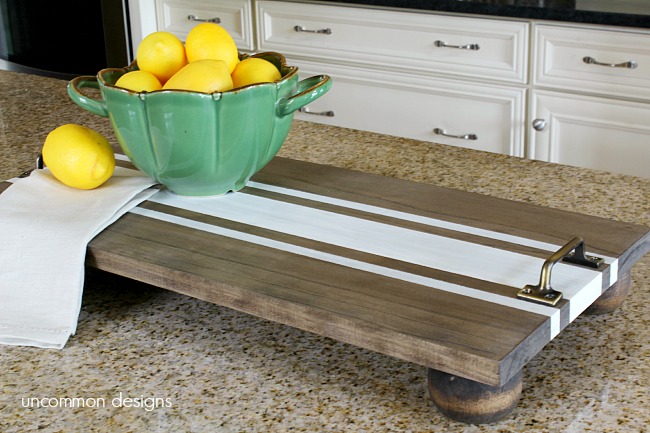
Now, grab that painter’s tape to create your ticking stripes. First I marked the center of the board on each end, as a starting pint. The thickness of the stripes is totally your choice. I created some DIY Burlap Painted Ticking Stripe Utensil Holders in the fall using the same concept of taping off these lines. The largest stripe is 2 1/2 wide. The smaller stripes are both 1/2 of an inch wide with a 3/4 inch stripe inbetween of stain. HINT: Measure carefully at both ends and along the way down the tape to keep it even and straight all the way from one end of the board to the other.
Step Five:
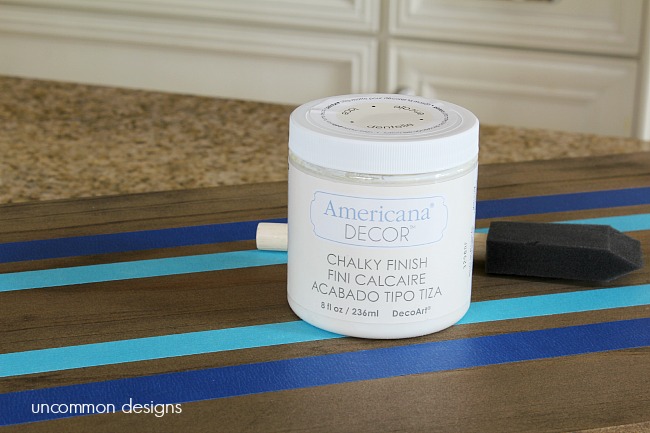
Now you get to have some fun! This Chalky Finish is fantastic. I applied it with a foam brush and followed the directions on the product container. I used 2 coats. It cover so well and has such a great look.
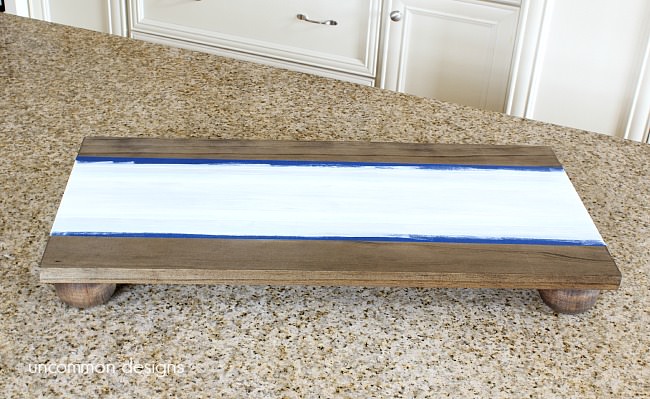
Here is the paint drying. Exciting..right?
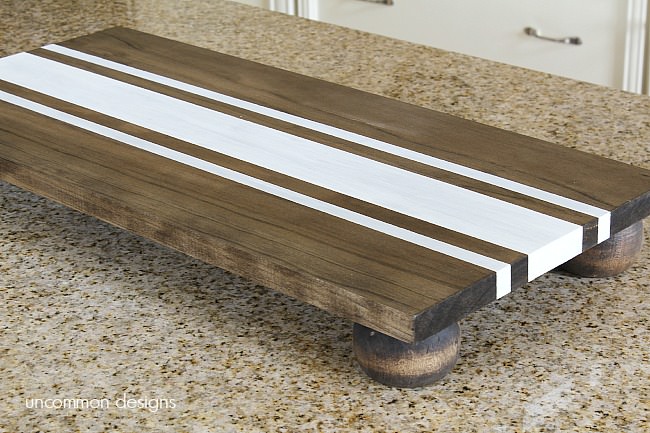
And here are my ticking stripes once the Chalky Finish was dry and I gently removed the painter’s tape. GORGEOUS!!! See how I continued the stripes around the edge of the board on both ends? I think that it really gives this a finished look.
Step Six:
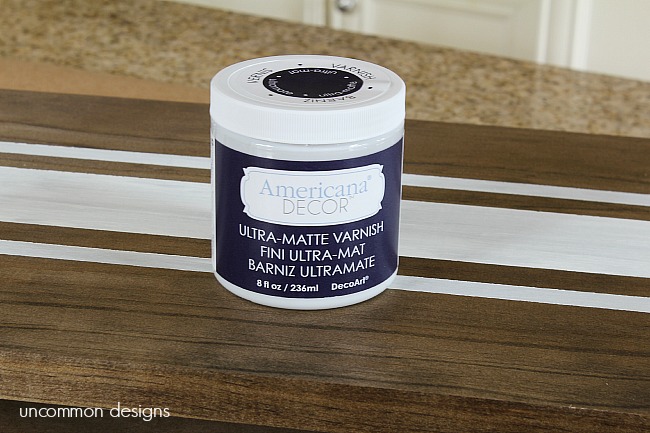
Ok ok… I know what you are saying….. “What happened to that creme wax that was in the supply photo?” Yea….a girl can change her mind, right? I had the intention of using the creme wax, but then I decided since I was going to be using this in my kitchen and the chance of spills was there….well…. I would use this incredible Ultra-Matte Varnish instead. This gives the server protection, but does not change the look of it at all. It was a perfect look for it!
Step Seven:
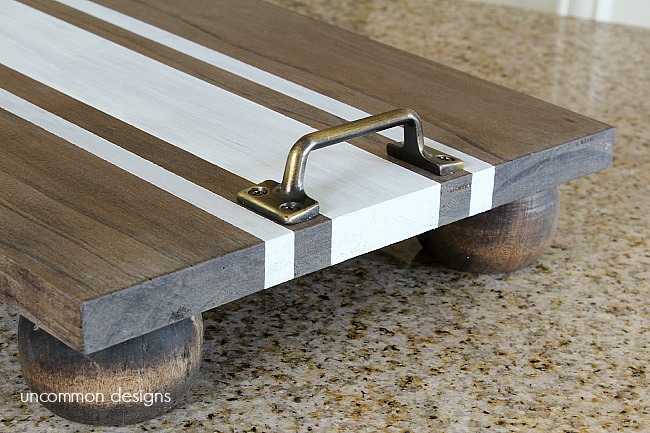
Once the varnish was completely dry, I completed the final step. I marked the holes in the furniture pulls on the tray with a pencil. I used the drill to start the holes and then placed the screws in each spot. There are so many types of handles you can choose! I love the simplicity of these, and they were actually in the screen door/utility section of the hardware section rather than in with the fancy cabinet pulls.

The Americana Decor Chalky Finish paint will be available in store at the Home Depot starting in April, but you can order it online now. The color choices are amazing and the possibilities for use are endless. I see a lot of home decor and craft projects using Chalky Finish in my future.

We are already getting great use out of this little tray. The handles were a great touch to make it both portable, and easy to move around. The Lace Chalky Finish color matches my cabinets perfectly! I could not be more pleased with this project.
Be sure to pin this for later!
Trish Flake
Latest posts by Trish Flake (see all)
- Easy Leopard Painted Pumpkin - October 18, 2021
- Embroidered Swedish Dishcloths - May 3, 2020
- Easter Egg Decorating Party - March 21, 2020
i agree..to cute. I love that and that home depot is going to start carrying the paint. Hope all is well!!
ohhh how I love this project!! 🙂
pinning!
This turned out great. I do love that you finished the ends.
So stinkin’ awesome – love it girl!
Hi Bonnie and Trish, I looooooove this project.
I’m going to make one of these myself. Keeping my eyes peeled for a nice piece of wood and some handles now.
Thanks and have a great weekend,
Lisa
Hey ladies!!! I am absolutely loving this! What a great idea!!! ~Christy
I can’t even tell you how much I love this! The details are so great … the feet, the stripes, the handles. Pinned it and really want to make one!
Love, love, love!!
This turned out so cute!! What a pretty little touch to your already pretty kitchen!
Just pinned this tray to my Tray Makeovers board on Pinterest, because I absolutely adore what you did! I love the Chalky Finish paint line too!
I am soooooo going to make a bunch of these for my catering company. They will be excellent to display everything from sandwiches to veg and dip to brownies! Cheese and crackers…you name it!
Thanks!
This is fabulous ladies! Such a good food photo prop too ; )
I LOVE this tray! And how simple it would be to make, yet it looks really “upscale”. Thanks for sharing!
I love those chunky feet! It looks great 🙂
I just saw this on Pinterest… because I’m browsing Pinterest to delay the inevitable fact that I need to get up and fold a load of laundry and feed the children and the husband dinner… and I love this tray! This is plum, dadgum clever and adorable. I want to stand up and clap loudly and shout out, “Well played! Well! Played!”
What a great project! This adorably rustic serving tray would make me smile, too.
Love it! How absolutely adorable. Thanks for the inspiration. Have a great week!
You can never go wrong with grain sack.
I need to try the Chalky finish pants — do you know how much they sell for?
And I LOVE that you included a photo of paint drying. You are too funny!
Oh it turned out great Bonnie!
This is cute as can be and I’m pinning!
Just gorgeous. So simple yet so effective. Stunning x
It’s GORGEOUS! All my faves, DecoArt, a tray and “feet.” LOVE!
Love the tray! The little feet are great. I’ve been dying to try this paint too!
Wow, I love this DIY tray. What a great idea and I love the rustic but finished look. Great job!
Love this! Pinning this now!!! laura ps where do you find the furniture “legs?” laura
I picked them up at Home Depot. I think most big box hardware/lumber stores should have them! 😉
I love this tray! Seriously on my ‘to-make’ list!
What a fabulous project. I love the stripes!
Very cool, you would pay a lot of money for those in a shop
I love this idea and will be sharing your project at The Scoop this Monday night. Thank you for linking up!
I love your wooden serving tray it turned out really nice! I love chalk paint but I haven’t tried the Americana Decor chalk paint before. I have used chalk paint on wood and on glass jars. I have even done a couple pieces of furniture with chalk paint. Thanks for sharing your tutorial, you make it look so easy.
Very cute! Love the design on top especially!
I just pinned this very nice board, this is a great project I would like to make.
Did you use oil based stain or water based? Any trouble with the water based varnish adhering well?
how simple it would be to make, yet it looks really “upscale”. Thanks for sharing!
I’ve always loved this one! Hope you gals are doing well! –Katie
Love this tray, too! It would be lovely for fall with some velvet pumpkins! Pinned!