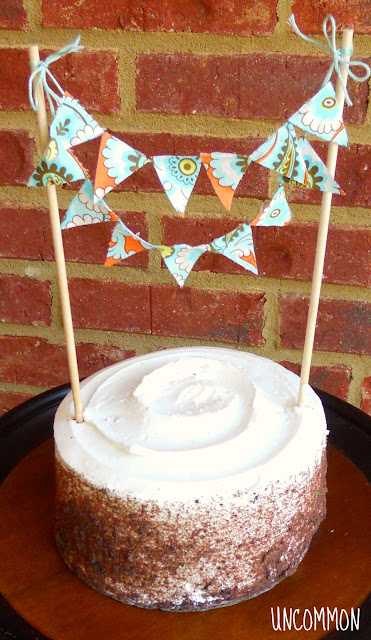
I love anything that professes to be sweet and easy. This double cake bunting fits that to a “T”! It is a quick and simple project that will not disappoint the next time you have something special to celebrate! The best part is that you can use your fabric scraps and really snazz up a store-bought cake. Those are a huge plus for me and anyone else who may be lacking a few baking skills!
Cake Bunting Tutorial
Supplies Needed:
- fabric
- matching embroidery floss
- 2 wooden skewers or dowels
- hot glue gun
- scissors
I think it is best to go ahead and cut your triangles first. I used 13 triangles that were 1 inch across the top and 1 1/2 inches on the side. You should iron them at this point to make them nice and crisp. Then, cut two equal pieces of embroidery floss about 24 inches long. Now we can start putting it together!
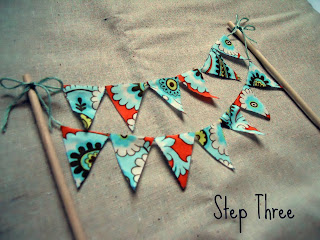
The first step is to dab a strip of hot glue across the top of the triangle. Quickly lay the center of the embroidery floss across the glue as shown above. Continue with the other triangles and make them meet tip to tip on each side. You will have six triangles on the lower strand and five triangles on the top strand.
You will attach the top strand to the dowels. First, decide how far apart you want your dowels to be. I used 9 inches for a ten inch cake. You will tie one side to the left dowel with less than an inch between the dowel and first triangle. You will do the same on the right side with the last triangle. No need to tie a bow at this point, but I did add a little bit of glue to make sure it didn’t slide down and trimmed the excess thread.
To add the second strand do the same as the first. You will want to leave about 11/2 inches between the dowel and the first and last triangle this time. Tie in a bow and trim the thread and dowels to your liking.
You’re done! Go Celebrate!
The following two tabs change content below.


Trish Flake
Owner at Uncommon Designs
Hey y'all! I am Trish and the creative voice behind Uncommon Designs. I adore party planning, holiday celebrations, and all things crafty! I am so excited to share my creative adventures with you!
Latest posts by Trish Flake (see all)
- Easy Leopard Painted Pumpkin - October 18, 2021
- Embroidered Swedish Dishcloths - May 3, 2020
- Easter Egg Decorating Party - March 21, 2020


This is so cute! I would love if you link this to my party! My readers would love it!
Xo
http://lechateaudesfleurs.blogspot.com/2011/09/link-up-and-win.html
That looks so cool! Not to mention delicious… 😉
Cograts on being featured on Sassy Sites – I’m your newest follower. 🙂
To Nap or Not to Nap…
That is just plain adorable–I love what it adds to your cake! So cute!
Cute! Pinning this! Exactly the look I want for my wedding cake. Visiting from Sassy Sites =)
I love how tiny it is! Very cute
cute and simple! love it!
That is such a cute idea I love the tiny bunting! I would love it if you come link this up at Scrappy Saturdays @ candacecreations.blogspot.com
These are just so adorable! thanks for sharing!
So sweet! Definitely makes for a special cake! Thanks so much for linking up to The Creative Spark – so happy to have you back!
Jenn 🙂
Very sweet. I have to make a birthday cake at the end of this week and I may borrow your idea. Thanks for sharing!
I love this idea! You are so creative! I’d love for you to link your adorable project to Things I’ve Made Thursdays. I’m trying something new this week- We have two sections to the party- one for kids’ things and one for “Anything”!! I think this post would be an awesome addition to the “Anything Goes” party!
Hope you’ll stop by on Thursday and link up!
Melanie
bearrabbitbear.blogspot.com
This is adorable!
This is adorable!! I would love for you to share at my party! : )
http://www.cherishedbliss.com/2011/09/craft-and-tell-no-21.html
This is really cute!! Thanks for the directions. I’ve been thinking about doing something like this. From what I understand, there’s definitely a “right” side, and a “wrong” side, right? But that could be remedied by putting a second triangle on the “wrong” side, correct? Lol, I hope that made sense. I’m a new follower from the Lil Pink Pocket’s Link party. Thanks so much!
How ADORABLE!!! Would LOVE it if you would link this project up to my turquoise linky party going on right now!!
So cute! LOVE bunting!!
Such small details, but adds the most impact! I love the fabric you chose. It makes for a gorgeous cake topper! Thanks for sharing this @ Show & Share!
Such a cute, simple idea! Love it! Thanks so much for linking up to The Creative Spark. I will be featuring this today. Hope you have a wonderful weekend and I would love to see you back on Tuesday night!
Jenn 🙂
I love this! It is so cute!
I would love it if you would share this and/or any other projects you have been up to at Tuesday Talent Show at Chef In Training! Thanks so much and I hope to see you there!
-Nikki<
Congratulations! This is one of the top ten stashbusting projects!…